Background

Thursday, May 30, 2013

Pajama Party!


Close To My Heart is teaming up with Big Picture Classes to bring you a live webcast with step-by-step instructions for making our Happy Thoughts kraft container. The FREE webcast will air this Thursday, May 30 from 7:00 pm to 8:00 pm (MDT). Anyone with an Internet connection can watch, so be sure to tell your customers and then tune in!

If you would like to interact on the message board, participate in live chat, post to the gallery, download handouts, or enter any contests, you will need to register for the event and log in to the Pajama Party “classroom.”

Once you’ve registered for the FREE class, follow these steps for entering the classroom:

  1. Scroll to the bottom of any page and click on “My Classes” under the “My Account” category.
  2. On the My Classes page, click on “enter classroom” next to the Pajama Party line item.
  3. Now you’re in the classroom! On the night of the event, you can go to this page to interact via the live chat, enter the giveaways, and download the free Close To My Heart project handout.
If you liked the kraft container I posted yesterday, you will want to check out this webcast as it was filmed during our corporate album retreat in March and my Dream Pop container was created based off its design.  See just how simple decorating these containers can really be!

Wednesday, May 29, 2013

Dream Pop, Pop Pop!

Lately I have been asked a lot what types of projects I have been working on and although I would love to show you pages upon pages of completed layouts for my scrapbooks, unfortunately my books haven't been what I have been completing. I have however been helping a friend with her scrapbooks before she has to move and in the last 2 months we have finished 8 albums!  WOW!!!  Now, if I could only do that with my own pictures :).

I did, however, take a small group of amazing ladies on a scrapbook retreat at the beginning of May where we completed this layout built upon the theme of our weekend.  We used our National Scrapbooking Months Dream Pop papers, Pink Glitter Gems, Color-Ready Trinkets Wooden Shapes and the May Stamp of the Month - Pinwheel.


Aren't the papers beautiful!  I love how the texture on the silver and orange papers on the left page just seem to grab you.  It makes me dream in pop - dream pop! :)

We also covered these cute little containers. These containers are great for gift giving, home decor, stashing little trinkets and so much more. I have a few friends who are going through a difficult time right now so I plan on printing out some encouraging Bible verses and putting them in the container to give to them.  Each day as they can pull out a new Bible verse and be encouraged and blessed.  What would you do with yours?


To get your dream pop paper and Pinwheel stamp set before they are gone - head on over to my website and shop now.  Also, remember, sign up for the I Am Blessed Album Retreat by May
31st and receive your Dream Pop Paper FREE!!!

Tuesday, May 14, 2013

Love your Layout: Black & White Photos, Borders and Layered My Stickease

Close to My Heart just released their newest Studio J video showcasing the Surfs Up paper pack and my sweet daughter - yeah!!!

Click the video below to see just how easy it is to change your photos to black & white, add borders and layer your My Stickease to give you a unique, one-of-a-kind embellishment.

Saturday, April 27, 2013

Later Sk8r papers–So Versatile


Last weekend we had our Later Sk8r workshop and I wanted to show you just how cool these papers are.  It was fun creating with these papers and seeing just what we could come up with. 
Here are the layouts we created:
Layout 1 – the workshop on the go layout:
IMG_4646
Here is the 2nd layout we created:
IMG_4642
The best thing about the above layout – the versatility.  The original layout that we were going to create looked like the one below.  We used the exact same cuts of paper but just the reverse side.  See how just by turning the paper over we took the paper from being very neutral to very boy centered.  Love it!  Hope you do too!

latersk8r_aa_l_328latersk8r_aa_r_700

Thursday, April 25, 2013

Album Retreat Coming Soon!!!


Album Retreat 2013

July 25th - 28th 2013

Join me for a retreat to remember!  A retreat where the soul purpose of the retreat is YOU!

Come experience 3- full days of pure creative bliss as you immerse yourself in the latest Close To My Heart products, unique layout patterns, and innovative art techniques.

How's this for a little enticement: During the retreat we will begin and COMPLETE an entire album -  10 double page layouts plus a cover page using our newest papers and embellishments while practicing several unique techniques throughout your layouts.  All papers will be pre-cut allowing for faster assembly and more time to spend on techniques and making your layout the way you want it.   Feed your creative juices, and soul, with a big blast of creativity, friendship, and relaxation at Album Retreat 2013.

Now for the details:

Cost:

Basic Registration for the Retreat is $200 which includes your cut papers, album, and basic supplies needed to complete the album.  There are many more items that will be needed to complete the album, but many of them you may already have on hand.  Click here for a complete list and order form of all the remaining items needed to complete the album. Only order the items you do not already own. E-mail me your completed order form and I will send you an invoice for your balance.  Again, all items will be needed to complete your album. 

Hotel:

We will be meeting and the beautiful Drury Plaza Hotel in Cool Springs, TN from Thursday, July 25th at 6pm to Sunday, July 28th at 4pm.   Attendees will receive the discounted hotel room rate of $129.95/night plus tax.  Click here or Call 1-800-325-0720 for Close to My Heart Heather Hicks Album Retreat group number 2179940 to reserve your spot.  Album retreats are a blast when you share a room with a friend or two and giggle all night :)  Reservations must be made by June 30th to guarantee the rate and availability.
Attendees who stay at the Drury Plaza will receive:
  • FREE Hot Breakfast - "hot" means fresh pancakes, scrambled eggs, biscuits and gravy, sausage and more.
  • FREE 5:30 KickBack  - from 5:30 to 7pm each evening, kick back, relax and enjoy the rotating menu of hot foods and cold beverages.  It's a meal to fill you up.
  • FREE Long distance - one hour every room every night.
  • FREE Wireless Internet Access - High speed internet in all the rooms, scrapbook/conference room and lobby.
  • FREE Soda and popcorn - from 3pm to 10pm every night in the lobby.
So, what are you waiting for.  Sign up now to join me for a relaxing weekend full of fun, laughter, scrapbooking and so much more!

Click Here to go to my blog and register for Album Retreat 2013!

Thursday, April 18, 2013

Cricut Party - Wise Old Owl!


Whether you use one Cricut®-cut piece or several, you can create cute party favors and decorations using your Artiste cartridge. Combine your Cricut® pieces with unique stamping techniques and you have projects that will knock your guests’ socks off! Want some recipes and tips for how to make this adorable artwork? Below are instructions for creating two pieces from the “Clearly the Best: How to kiss—with stamps” episode. Combine the Cricut®-cut pieces for these projects with the kissing stamping technique taught in the video, and you have a stellar 3-D item! Want to learn more about the kissing stamping technique? Watch this video

Recipes and Tips

Party Banner
Stamp set of your choice
X5668 Honey Cardstock
X5764 Pear Cardstock
1272 Cranberry Cardstock
Z2197 Pear Exclusive Inks® Pad
Z2163 White Daisy Exclusive Inks® Pad
Z1751 Baker’s Twine Harvest Assortment
Z1311 1¼” Circle Punch
Cricut® Shapes:
Artiste
1″ Shift+3D Object (cut 56, p. 57)

Art Tip! This banner only uses one type of Cricut® shape, but the finished product is still stunning. Use stamp kissing to randomly stamp across the pieces using the stamp set of your choice. Score with the help of the Cricut®-cut score lines on the shape and piece together to create little globes. Tie together with baker’s twine and voila!

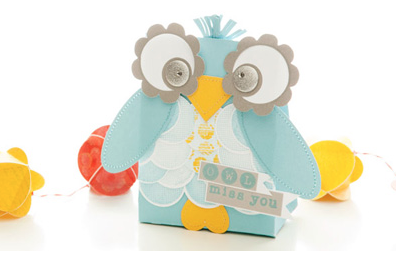
Owl Miss You Bag
1385 White Daisy Cardstock
1292 Crystal Blue Cardstock
X5668 Honey Cardstock
X5930 Slate Cardstock
Z2162 Honey Exclusive Inks® Pad
Z2117 Crystal Blue Exclusive Inks® Pad
Z1349 Shimmer Designer Brads
Z1752 Sparkles Clear Assortment
Z1311 1¼” Circle Punch
Twist Ties
Thread
Cricut® Shapes:
Artiste
4½” 3D Object (p. 77)
4½” Shift+3D Object (cut 2, p. 77)
1″ Shift+Accent 2 (p. 51)


Art Tip! This project uses many Cricut® shapes and all the pieces coordinate so nicely for an adorable finished product. Use the Artiste assembly booklet to put the bag together and then add the embellishments. The feathers are created with punched circles that are stamped using the kissing technique; however, if you don’t have the circle punch, you can easily make these using the Cricut as well. The eyes were created using Shimmer designer brads, but you can use any large brad or button to create the same look. Finish with the “owl miss you sentiment” for a special touch.
Don’t have the CTMH Cricut Cartridges?  The wise ole owl says- Click here for more info!