Background

Friday, March 27, 2015

Only a few more days left!

In just a few days our Seasonal Expressions 1 catalog will expire and our brand new Seasonal Expressions 2 will be available and ready to order from.  As we look forward to our new seasonal catalog being released that means we also say goodbye to some fun items from this current book.  If you didn't get your Hopscotch or Heartstrings papers, puffies, and embellishments than make sure to order yours today before they are gone!

Friday, March 13, 2015

Fluttering with Artfully Sent

This time of year is so fun! One week there is snow here and the next week we are having beautiful 60 degree weather.  With spring right around the corner I needed some cheerful colors in my scrapbook room so I decided to play with our Brushed papers and created this VERY simple card.

I

Let Me Show you how to make this card too!

I created this card using the New Cricut Explore/Design Space and Close to My Hearts Artfully Sent Cartridge. 

The first thing to know about using the new Cricut Explore machine and the Artfully Sent cartridge is that all the images are grouped together for each card or envelope.  You can search by attributes that are on the card, in this case butterflies and in this case it would probably work. However, the best and easiest way to find the images you want is to use the codes that Cricut assigned each image.  

Unfortunately Design Space was created after our cartridges were released so the booklets included with the cartridge do not have the codes printed with the images.  BUT Narelle at The Non-Crafty Crafter went through each Close to My Heart booklet and typed in each code for each image.  How awesome is she!!!!  Click here to link to her hard work and download your own copy of each CTMH cartridge booklet with codes. 


OK back to the card....Input the code shown above in the search field- The # must be included in the code.  This will pull up the card image shown above.  Design Space does not pull in the card at any specific size so make sure you adjust the size under edit in Design Space. I created this card to be a 5x7 so using the Edit button and under height I entered 7 and width automatically adjusted to 10 (with the lock button on).   I then just cut the card out on our White Daisy Cardstock.  Always save all of the negative images from your cards because you never know when you might want to use them on another card or layout.  In this instance, the negative images were beautiful butterflies that I was able to bring back into my card.  

After cutting out the card, fold on the score line created when cut out.  I then needed an inside to my card so using my trimmer I cut a piece of patterned paper from the Blushed Paper Pack 7x10, scored it the 5" mark, folded it and glued it to the inside of my card.

From there I just simple used some of the negative butterflies (butterflies that were cut out to create the card), folded the wings up and glued down just the body to random holes on the card - not the original spot where each butterfly was cut from but randomly so  the colors from the patterned paper would seep through the extra space and add dimension. They I simply added a Pixie Aqua Dot to the head of the folded butterfly.  Wa-la!

For the inside of the card I wanted to add just a simple sentiment so I got out the stamps that came with the Artfully Sent card and decided to use the frame and sentiment set.  


To cut the frame for the Curlicue Stamp Set (D1631) to fit, I first had to locate the image in the booklet.  Here's the tricky yet not tricky part.  As I said earlier, in Design Space all the cards and their icons, embellishments, sentiments are already laid out and attached on the card for you.  All you do is add the code to the search field and it brings up every layer for you. If I wanted to cut the whole card that would be perfect! However, I just want the frame piece. So.... I put in the code #M101A2 (see below), which pulls up all the layers of the card, then I select ungroup and am able to separate all the layers.  From here I just delete each piece except for the one I need - the frame (or Icon) as shown below.
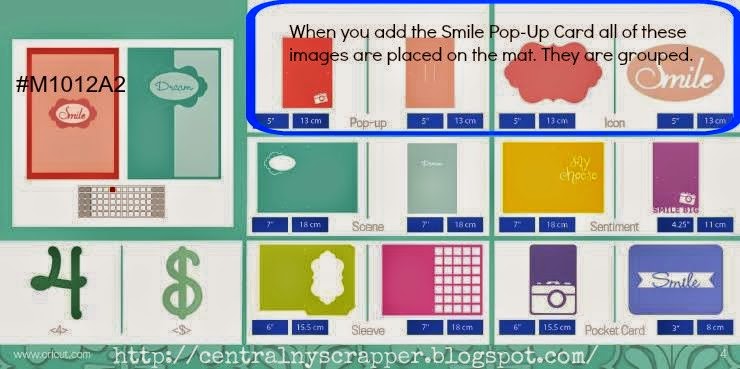

(Thanks to Brenda Lapp for creating this picture above of the booklet so I could show you how!)

Once all I had on my screen was the icon/frame you press go to cut. I ended up stamping the frame in Cranberry and the Sentiment in Lagoon.  And there you go.  It takes a lot more typing for me to explain it but really the process is pretty simple - especially when you have the codes for each card - thank you again Narelle!

I hope you were able to learn something or be reminded of something here.  Close to My Heart's Cricut Cartridges are the absolute best and offer soooo much more than the other regular cartridges.  Don't be intimated by all they have to offer and come with - just enjoy all the possibilities!

To see all the Cricut cartridges CTMH has created check out my website.


Sunday, February 22, 2015

Hopscotch Rescheduled

Due to the passing of my grandfather and then the icy weather outside I have had to reschedule our Hopscotch workshop for a later time.  If you were interested in attending but the original date didn't work for you, e-mail me and let me know. Hopefully you will be able to join us for our rescheduled date - still to be determined. 

In the mean time, join me for our Getting to Know Close to My Heart Workshop this coming Saturday, February 28th at 3pm.  During this workshop you will get to work with CTMH papers, stamps, embellishments, washi tape and more. This one-page layout and coordinating card is only $7! Please register to reserve your spot by using the PayPal link to the right of this page.  All papers will be pre-cut. Just bring your basic scrapbook supplies (ie., scissors, adhesive, etc.) and come ready to have fun!


Sunday, January 25, 2015

Love me some Hopscotch!

These last couple weekends I have been blessed to get away for 2 different scrapbook retreats and oh what fun it is!  I love it when I have 2 - 3 full fledged days to scrapbook, laugh, eat and not sleep the weekends away! :)

During these trips I was able to play with our new Hopscotch papers that are in our Seasonal Expressions catalog and let me say - I am in love!.  They are so playful and colorful!  So many possibilities!!! These papers are only available until the end of March so even if you can't join us for the workshop, and you love the papers, don't wait, order your papers and embellishments now before they are gone.

The workshop is coming up quickly so plan now! Join me February 7th, 1-4pm at my home to create these fun layouts.


There are two workshop options:

  • Basic Workshop for $30
  • Full Workshop Kit for $42

Workshop kits will include:
*


* Basic workshop does not include the stamp set shown above

Sign up to join me for the workshop using the link to the right. You must sign up by Jan 29th to guarantee your spot!  See you there!


Monday, January 12, 2015

Having fun "This Moment"

The other day I had one of those rare moments where I wasn't called into 5 different directions and I had some play time in my office.  I pulled this months stamp of the month - This Moment and decided to get creative.   Sometimes it is fun to have no plans in mind but just to see what you can do.  Here's a couple of the cards I was able to create.


I cut the frog using our New Artfully Sent pocket card. I hate waste so wanted to create with both the negative and the positive.  For both the eyes in card 1 and the pumping heart in card 2 I used the fun Adhesive Springs (Z1725).  I love how the target/bulls eye worked perfectly for the eyes and heart.
This stamp set is only $5 with your $50 purchase this month only so get yours today. 

Thursday, January 8, 2015

Yuletide Carol Memories

I absolutely love Christmas - everything about it! The whole month of December is spent baking cookies, decorating the house and the tree and buying presents for family and friends. I love the act of really thinking about people and their heart and buying presents for each person based on who they are not just buying presents to give presents. But most of all, I love watching my kids do the same thing. They each love to think of the best thing they can make or purchase for each person. Many times they don't stop at immediately family either, they love to get the perfect something for their aunts and grandparents too!  It is awesome to watch their excitement on Christmas morning as they refuse to open their own gifts and they fight over who gets to GIVE their gifts first. I guess if you have to hear your kids argue - that's the best argument you can hear!  

If you are like me you take 250+ pictures at Christmas and then struggle to figure out how to scrapbook them all. I have decided that scrapbooking them ALL isn't a good idea or everyone gets bored really quickly looking through your album because they are all about the same event :) But I do enjoying creating several layouts to celebrate each occasion when we celebrate the Season of My Saviors birth with both sides of our family.


Join me January 31st for my Yuletide Carol Scrapbooking Workshop. We will be meeting at the Winchester Bldg in Spring Hill. We will create both the layouts shown above and one more original layout that will house several small pictures. 

Workshop attendees will receive the items shown here:


Their are two different workshop options to choose from. Both will have all the papers pre-cut and ready for assembly but the Better workshop includes the above exclusive coordinating stamp set with the kit.

You must register by January 10th for your items to arrive in time so click the link to the right and save your spot for this fun workshop to preserve this years favorite Christmas memories.